Every software undergoes a lifecycle involving scrutiny, improvements, and feature enhancements, resulting in different versions. While software updates are common, the migration process may not always be easy. This holds true for Drupal as well, with the open source platform witnessing version releases that require updates for its seamless use.
The launch of Drupal 9 has therefore, prompted enterprises to migrate from Drupal 7 and 8 to version 9. So, whether you're currently on Drupal 7 (previously scheduled to reach EOL in November 2023 but now extended to January 5, 2025) or on Drupal 8 (D8 reaches its end-of-life on November 2, 2021), you'll soon be seeking the expert guidance of a Drupal Migration company.
Fret not! To ensure a hassle-free migration, contact our experts at Srijan and if you're aiming to transition in-house, follow the steps below:
Getting Started with the Migration Process:
Upgrading D7 to D8
Step 1: Take back-up of your website
Start the migration process by making a local copy of your website. As making changes to live site is not recommended, it is a best practice to keep all data safe by taking a backup locally on your machine.
Step 2: Install fresh new site
Install a new Drupal 8 site by downloading the latest version of Drupal from drupal.org.
Install the latest release of Drupal 8 along with installing dependencies with Composer.
Step 3: Prepare your Drupal 8 website for the migration
Setup a local Drupal 8 website on your machine as a destination website for the migration process.
Step 4: Verifying the modules are in core and enabled
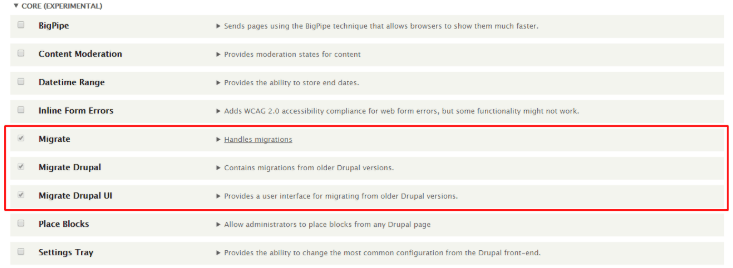
Ensure Migrate, Migrate Drupal and Migrate Drupal UI modules are enabled on your Drupal 8 site. This can be done by navigating to the ‘Extend’ tab of your website and ensuring all the above modules are present in the core.
Now, check the three modules and click ‘Install’ button at the bottom of the page.
Step 5: Upgrade your website
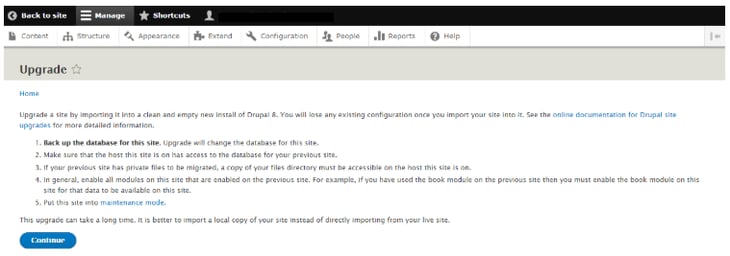
Go to your website and append the website address with /upgrade (www.<yourwebsitename>.com/upgrade) and follow the instructions. Now click ‘Continue’ button.
Step 6: Enter website details
On clicking ‘Continue’ the below screen comes up which asks you for the website credentials, database location and other details.

Step 7: Start the migration
If the database credentials to your source database are correct, the upgrade review page will appear on the Migrate UI. It will show the summary of the upgrade status for all installed modules on the old site.
As a site builder you should carefully review the modules that will not be upgraded and evaluate if your Drupal 8 site will work without the module.
click on ‘Perform Upgrade’ button.
Tip: Don’t proceed and perform the actual upgrade without first installing the missing Drupal 8 module.
Tip: If you get ID conflict warnings
If you manually create a node to the Drupal 8 site before upgrading and the source Drupal 6/7 site has a node with the same ID, the migration system will overwrite the node that was manually created in Drupal 8.
If conflicting IDs are detected, a warning about conflicting IDs will be shown which can be ignored to risk losing data or abort and take an alternative approach.
Depending on the size and types of content/configuration on the source site, the upgrade may take a very long time. Once the process is finished, you are directed to the site's frontpage with messages summarizing the results:
Upgrading D8 to D9
When it comes to migrating to Drupal 9 from Drupal 8, process is quite simpler. As D9 is an extended version of D8, it is much easier to upgrade. Read the complete guide of Drupal 8 to Drupal 9 upgrade to understand the complete process.
Alternate Method: Migration using Drush Command
Upgrading to Drupal 8 using Drush is useful when migrating complex sites as it allows you to run migrations one by one and it allows rollbacks.
If you are using Composer to build your Drupal 8 site, then you may already have Drush installed. However, if not, then you can install Drush from command line as follows:
composer require drush/drush
To migrate using Drush you need to download and enable the contributed modules: Migrate Upgrade, Migrate Plus and Migrate Tools.
Ensure the Drush is up to date (with the command: “drush –version”)
Now it’s time to start the migration through Drush with following drush command
“drush ://user:password@server/db — ://example.com –configure-only”
Where the below mentioned values can be with your values in the above command
- ‘user’ is the username of the source database
- ‘password’ is the source database user’s password
- ‘server’ is the source database server
- ‘db’ is the source database
Now check your migration status (with the command “drush migrate-status”)
Import the data with the command (“drush migrate-import –all”).
After successful migration, go to the structure->migrations to check the status of migration.
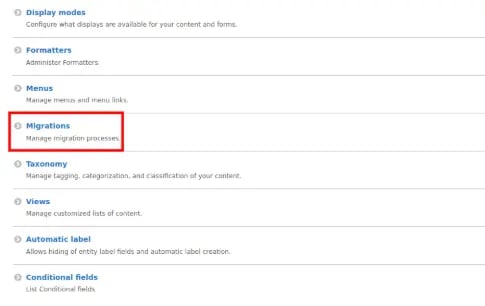
Check the list migration button next to the migration group ‘import from Drupal 7’ to view the entire migrated data.

After clicking on all upgraded data will be visible. Click to the execute button and data will be imported.
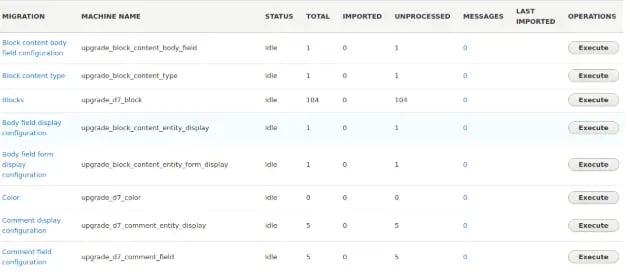
Once you click on the execute button, you will be redirected to the page with below mentioned options.
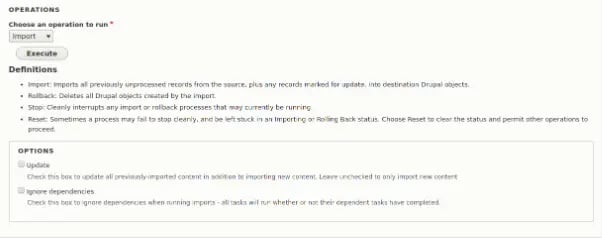
Import button imports all previously unprocessed records from the source into destination Drupal objects.
With this we come to an end of our Drupal migration process. If the above steps are followed carefully, a website can be easily migrated to the latest version.
If you're curious to know more, read through Your Frictionless Passage to Drupal 10! to upgrade to Drupal 10.
Don't let the migration process overwhelm you. Check out our Drupal Migration services and contact us to seamlessly get started with the latest version of Drupal!
Our Services
Customer Experience Management
- Content Management
- Marketing Automation
- Mobile Application Development
- Drupal Support and Maintanence
Enterprise Modernization, Platforms & Cloud
- Modernization Strategy
- API Management & Developer Portals
- Hybrid Cloud & Cloud Native Platforms
- Site Reliability Engineering


