
-3.png?width=100&name=MicrosoftTeams-image%20(4)-3.png)

In today's fast-paced world of technology, cloud-native development and deployment are the norm. Developers and organizations are continually seeking efficient ways to manage and deploy their applications in the cloud. One platform that stands out in this regard is the Korifi Cloud Foundry.
What is Korifi Cloud Foundry?
Korifi Cloud Foundry is an offering developed by the Cloud Foundry community. It emerged from the need for internal development platforms built on top of Kubernetes. The primary goal of Korifi is to provide a higher-level abstraction over Kubernetes, enabling developers to focus on building applications rather than managing infrastructure. While Korifi is built on Kubernetes, it continues to support core Cloud Foundry capabilities.
Korifi continues to support core Cloud Foundry capabilities
Key features of Korifi Cloud Foundry include:
- Multi-cloud Support: It allows you to deploy applications to a variety of cloud providers, including AWS (Amazon Web Services), Azure, GCP (Google Cloud Platform), and more.
- Developer-friendly: Korifi Cloud Foundry offers a user-friendly interface that makes it easy for developers to push their applications without worrying about the underlying infrastructure.
- Automated Scaling: Applications can scale automatically based on traffic, ensuring optimal performance without the need for manual intervention.
- Service Marketplace: It provides a marketplace of pre-configured services that can be easily integrated into your applications, such as databases, messaging systems, and caching services.
- Security: Korifi Cloud Foundry comes with robust security features that protect your applications and data.
- Multi-tenant: Korifi utilizes Kubernetes role-based access control and custom resource definitions to mimic the robust Cloud Foundry paradigm of orgs, spaces, users, and roles.
- Any Language, Any Framework: Korifi preserves the classic Cloud Foundry experience of being able to deploy apps written in any language or framework with a single cf push command. It enhances the app developer experience by using Paketo buildpacks to build applications as OCI-compliant containers.
Korifi Architecture
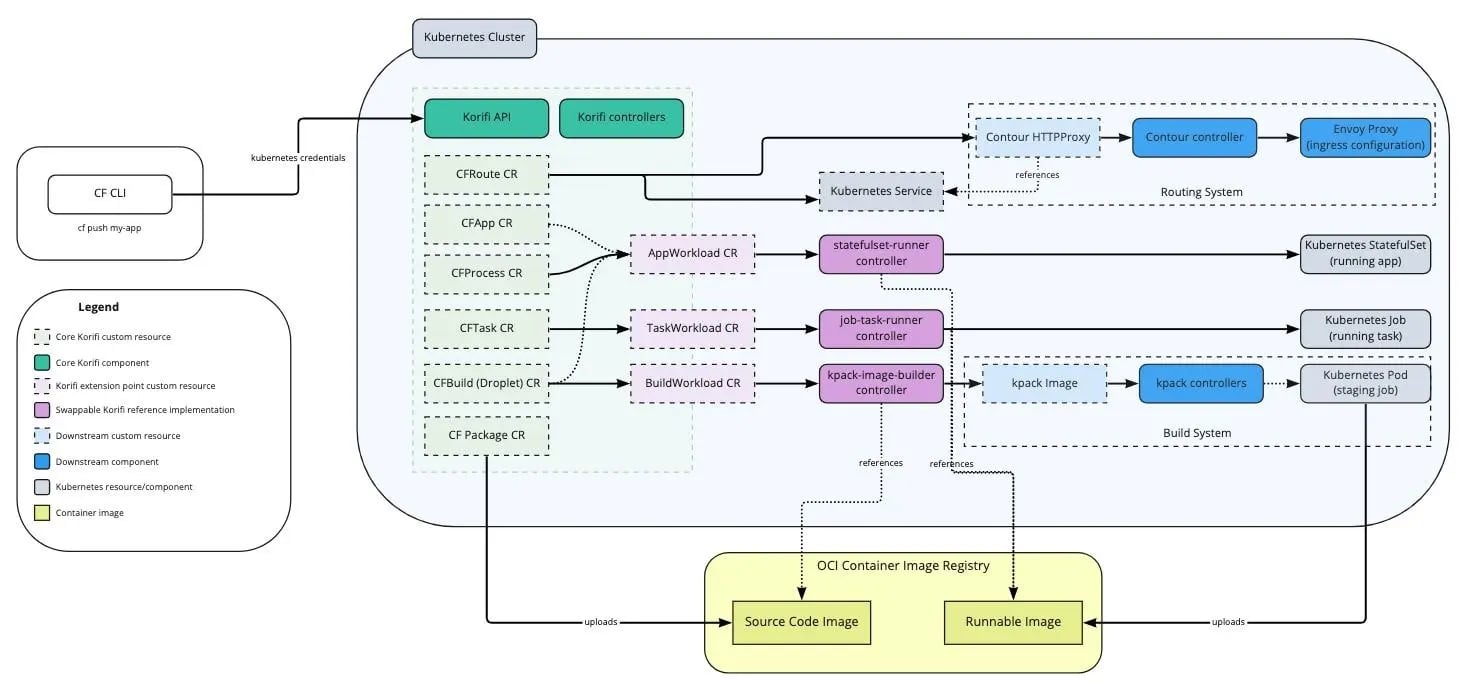
Now that we have introduced you to Korifi Cloud Foundry, let us delve into the setup process.
Setting Up Korifi Cloud Foundry
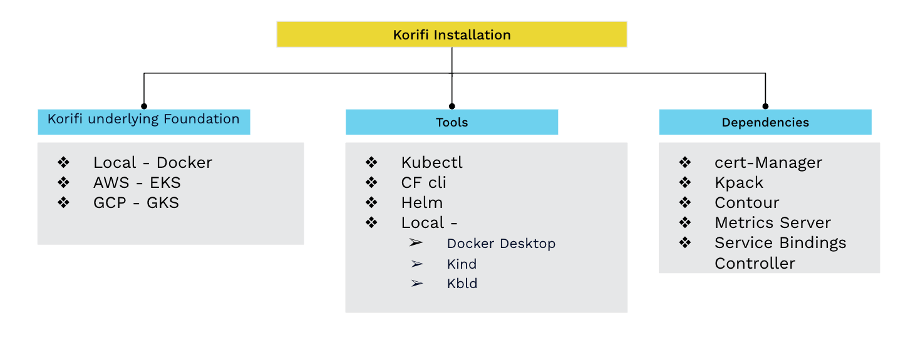
Prerequisites
Before you begin, ensure you have the following prerequisites in place:
- A Kubernetes Cluster: You need a Kubernetes cluster running to deploy Korifi Cloud Foundry. You can use a managed Kubernetes service like AWS EKS, Azure AKS, or GCP GKE.
- kubectl: Install and configure kubectl to interact with your Kubernetes cluster.
- Helm: Helm, a package manager for Kubernetes, is required to deploy Korifi Cloud Foundry. Install Helm by following the official documentation: Helm Installation.
- cf: cf is the Cloud Foundry command-line tool. Install the latest version of the Cloud Foundry CLI.
Installation Steps
- **Clone the Korifi Cloud Foundry Repository:**

- **Change Directory:**

- **Edit Configuration:**
Open the values.yaml file and customize the configuration options as needed. This file contains various settings for your Korifi CF deployment, including the domain, ingress settings, and other parameters. Make sure to review and modify these settings according to your requirements. Save your changes after editing the configuration. 
- **Add Helm Repository:**

- **Install Korifi Cloud Foundry:**

- **Monitor the Deployment:**
You can monitor the deployment progress using kubectl:

- **Access the Dashboard:**
Once the deployment is complete, you can access the Korifi Cloud Foundry dashboard using the domain you configured in values.yaml.
Steps to Deploy a Sample App:
Follow these steps to deploy a sample app using Korifi CF:
- Login to Korifi
First, you need to log in to Korifi CF using the cf command-line tool.
Replace <your-korifi-domain> with the actual domain you configured during the Korifi CF setup.

- Push the Sample Application
Now, navigate to your sample application directory and push it to Korifi CF. Make sure your application has a manifest.yml file that specifies the application details. Korifi CF will detect the buildpack based on your application type (Node.js in this case) and deploy the application.

- Access the Deployed Application
Once the deployment is complete, you will receive a URL for accessing your application. It will have a format similar to the following:
https://<your-app-name>.<your-korifi-domain>
Simply open this URL in your web browser, and you should find your sample application up and running.
That is how you can successfully deploy a sample application using Korifi CF.
Conclusion
Korifi Cloud Foundry simplifies the deployment and management of cloud-native applications, making it an attractive choice for developers and organizations. By following the steps outlined in this guide, you can easily set up Korifi Cloud Foundry on your Kubernetes cluster and start reaping the benefits of a cloud-native development platform.