Whether you are running your business into B2B space or B2C space, the need for agility and speed in workflow management is indispensable. Because eventually, clients also expect faster delivery of the project/application to catch up with their customers’ requirements.
However, if developers do not use any standard tools, it can add unnecessary overhead and eat away their development time. Also, given that they are coming from different backgrounds and skillsets, it would become difficult for stakeholders to set up projects, onboard developers, troubleshooting, and even train them as large-scale projects come with complex requirements.
That is why it’s critical to have a standardized development environment across the teams. This blog guides you on using Lando software (an open-source tool that provides a single local development environment for all the developers’ projects) with Drupal 9 composer, PHP & SCSS Linters, and a multisite architecture scenario.
How Lando Provides a Standard Development Environment?
Setting up the project from ground level to managing configurations and distributing it to each developer, including frontend & backend, becomes tedious due to various aspects, including different machines, a different configuration of the machine, and different OS.
And that’s where Lando software comes into the picture.
What is Lando Software?
It is an open-source, cross-platform, local development environment, and DevOps tool built on Docker container technology. Its flexibility to work with most of the major languages, frameworks, and services helps developers of all skill sets and levels to specify simple or complex requirements for their projects and then quickly get to work on them.
Some of the benefits of Lando include-
- Maintaining standardization across project/application.
- Offering speedy development(prebuilt configuration of the composer, drush).
- Add tooling to extend it from services.
- Recommends out-of-the-box settings that are customizable.
- Automates the complex steps involved in unit testing, linting, compiling, or other recurring workflows.
How to Use Lando With Drupal 9’s Composer.json for Faster Development?
Consider a scenario when a developer has been replaced in the team with the new developer for the existing Drupal project. The new developer might not be familiar with the OS that others are using. Here, it would become difficult for him/her to install the composer quickly. And hence, this would delay his/her onboarding process.
However, if the team is already using Lando for development, it would take care of the operating system’s bottleneck itself. In fact, the composer is already built in the recipe (Recipes in Lando are the highest level abstraction and contain common combinations of routing, services, and tooling) of Drupal 9 and is also compatible with different OS. The only thing is developers should know how to use it.

Steps to Use Lando with Drupal 9’s composer.json
The prerequisite for this setup is that your local development machine should be compatible with Docker and Lando and installed successfully without any glitches. Make sure when you are running docker setup, other ports are not conflicting with Lando setup.
Here are the steps to be followed-
- You need to clone this Drupal 9 open source git repository.(Ex:
git clone git@github.com:AbhayPai/drupal9.git)
-
Change the directory to the cloned repository. (Ex: cd drupal9)
- Start your app using the lando start command. Before you begin, you can change some parameters in .lando.yml as per the need of your application.
This repository would give you some common tools that include linting of PHP, linting of SCSS, linting of js files, and compiling of SCSS files and services like node.js and npm to directly connect with the Lando app. You do not need to go inside any container after starting your application. By default, this repository is only able to lint custom themes and is flexible enough to extend it to custom modules and profiles.
How to Use PHP Linters With Drupal in Lando
As Drupal is one of the largest open-source communities, millions of developers contribute and offer coding solutions in different ways. To standardize the coding practices and make the modules easy-to-maintain and readable, varying from indentation, whitespaces to operators, casting, line length, and many more, Drupal has a core package that takes care of these standard practices automatically when configured in the project. In general, these are called PHP Linters.
Following are the steps to configure the PHP linter in the project-
- Download dependencies package of Drupal coder using `lando composer requires drupal/coder`.
- Define a file for linter standard or copy file from Drupal core in your project folder where all standards are predefined in the XML file. It resides in core/phpcs.xml.dist.
- Configure a tool of `lint:PHP` within the .lando.yml file like the below example-

4. Confirm if tooling is configured correctly just by using the ‘lando’ command to list all tooling. ![]()
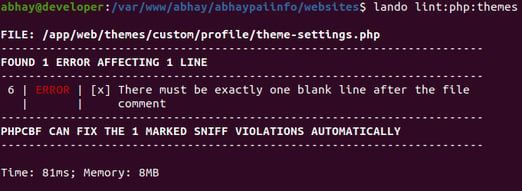
This automating tool which is configured with Lando software will help developers save time for finding and fixing these issues and will also ensure best practices are followed in the project repository.
How to Use SCSS Linters With Drupal in Lando
SCSS is a preprocessor used for writing CSS or CSS3 in any modern-day project. This SCSS is used because it helps developers to write less code and remove redundancy in the repetition of classname and other properties which are frequently used in the project.
The purpose of using SCSS linter in the project is to ensure that the quality of the code is high and easily maintainable for future enhancement. Further, it would save time in development and faster delivery of the projects.
Following are the steps that need to be followed for configuring the SCSS linter in our project-
- Configure node service and install gulp inside that service within .lando.yml file.

- Configure tool for using npm with Lando within .lando.yml file.

- Confirm if tooling is configured correctly just by using the ‘lando’ command to list all tooling.

- Create a package JSON file and install and configure the stylinter package in the project.
- Create a new script in the package.json file for triggering stylinter.

- Configure the tool to trigger this using lando.

- Confirm if tooling is configured correctly just by using the ‘lando’ command to list all tooling.

- Run this tooling command and Lando will lint it automatically.
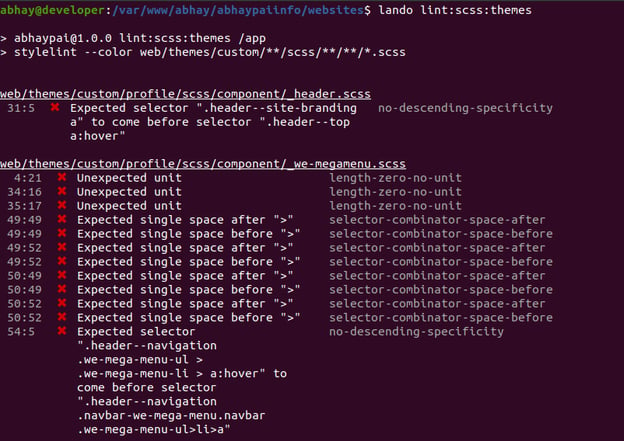
This automation tool integrated with Lando for SCSS linter will ensure that best practices and code hygiene is followed in the project repository.
How Can Lando Help in Reducing Developers’ Efforts While Building Drupal Multisite Architecture?
Let’s take a scenario where your project ( client’s website) is live now and running smoothly. Now the client wants to create multiple new sites in alignment with the existing site. For instance, the new sites should have custom modules, themes, profiles, etc. to ensure brand consistency.
Here, Drupal would come in handy as it would simplify the multisite architecture and speed up the local development setup with Lando through some minor tweaks in configuration files.
For setting up multisite architecture in an existing project, you need to follow below steps-
- Configure .lando.yml file to setup app server URL for the new website
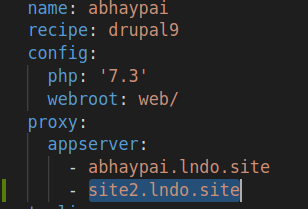
- Configure database server for setting up this site with the new website
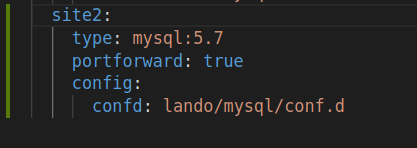
- Configure drupal settings like sites,php, and folder structure for site2; to leverage this Lando configuration


- Rebuild configuration for setting up this new website.
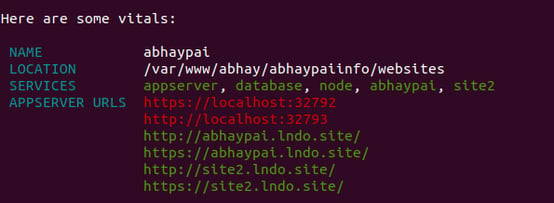
The minor tweaks in the existing project would help you extend existing Lando projects/websites to build multi-site architecture via local development and accelerate the delivery process for the client.
Conclusion
If you have come this far, Dhanyavaad (thank you). I hope that this article would help you in speeding up the development process & hence, faster project delivery, knowledge transferring of your application/project with Drupal, and leveraging Lando at its best by using inbuilt composer for automation in local development environments.
Now that you are armed with the knowledge and Lando’s benefits, what are you waiting for? Get started now!
Our Services
Customer Experience Management
- Content Management
- Marketing Automation
- Mobile Application Development
- Drupal Support and Maintanence
Enterprise Modernization, Platforms & Cloud
- Modernization Strategy
- API Management & Developer Portals
- Hybrid Cloud & Cloud Native Platforms
- Site Reliability Engineering


